Intro
In today's video I'm going to share with you my favorite drag and drop transitions. It's called Film Impact. It's really easy to use. You just drag and drop it between clips and you have these really cool transitions. And I'm giving away three subscriptions to Film Impact's Big Bang subscription. So leave a funny comment below and fill out the form below for a chance to win. Without further ado, let's go ahead and jump on in.
About Film Impact Transitions

First off, film impact is a paid subscription, but you can get your first 30 days free with unlimited access without any watermarks. And better yet, once those 30 days are up, there are four transitions that remain free for you. This includes the blur color impact, the dissolve impact, the push impact, and the roll impacts, which is pretty sweet, right? So you can keep those for free to use in your videos forever beyond the 30 days free. Inside of the Big Bang subscription, there's over 58 transitions and tools, but which ones do I use the most?
Text Animator

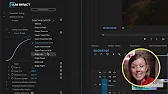
Let me show you. The first one is under the smart tools category. It's called the text animator. So after you install it and you go to effects, you can search for smart tools. And here is the film impact smart tools. There's motion camera, motion tween, and text animator. The first one I wanna show you is the text animator. Here inside of my timeline, I just have this text that I typed out. To make this text have some animation, I don't have to do any key framing. I can go to text animator, drag and drop this on the very beginning of the clip. And now we have our animation. If I wanna make it slower, I can just drag this out. But let's go ahead and make it a little bit shorter to make it quicker. And then we can play around with some of the presets. So when you click on the transition in the timeline, you can go to effect controls. Here you will see the film impact text animator. You'll see a bunch of different parameters down here that you can play around with if you have experience with different types of motion design, such as adjusting the vertical zoom, vertical spacing. But if this is overwhelming for you, there are presets. So from the preset dropdown, you can go ahead and choose maybe fly random and then play this back. And there's a new animation. We can try squeeze up random. And now we have a different text animation. And better yet, right above text animator, you can control click and click save preset.
How to Save a Preset
So if you like animation that you created, you can save it as a preset. Underneath presets, you can see I have three different text animator presets and beneath the presets, there's another cool little button called surprise me. So if we click on this, it will generate a random configuration of animations for this text animator. So let's play this back. And if you want this to be applied to the end, all we have to do is select the transition command C or control C on a PC and then paste it at the very end. And then you can move this layer and to whatever duration that you want. And now we have our in animation and here are out animation. So the text animator is great if you just want to be able to create some quick text animations without having to deal with any motion graphics templates. You just create your text and apply text animator.
Motion Camera
All right, let's go on to the next one, which is motion camera. Motion camera is also one of the smart tools from film impact. And what it does is create seamless transitions. So we can drag and drop this in between these two clips here. And now we can play it back.
Create Seamless Transition
And you can see it's seamlessly blended together and better yet, we can make adjustments to this. So select the transition, go up to effect controls. And again, from presets, we can try, for example, the super twist out counterclockwise. And let's see how this looks.
pretty cool, right? So just within this one transition motion camera, you have all these presets and it works super fast. There's no red bar above these clips like other types of seamless transitions that you use in Premiere Pro. It's seamless. It's fast and you should try using it and better yet. We can actually add a sound effect.
Add SFX

If I go into my sound effects here that I've downloaded, I can add this metallic whoosh sound effect line it up here. And there we go. Now we have a complete effect. If this video is helping you out so far, be sure to give it a thumbs up and subscribe. I also run monthly workshops on Super Peer.
Register for Live Workshops

So if you want to get some more in-depth looks at the different things that we do here on Premiere Gal, such as video editing, audio design, color grading, go to superpeer.com/gal to see the fall schedule and register for upcoming workshops. Also, all the music and sound effects in this video was provided by Epidemic Sound. If you're looking for unlimited music and sound effects for your videos, whether it's for commercial projects, YouTube or social media or podcast, you can sign up and get your first 30 days free using my link below and you can use this discount code right here to get 50% off your first year.
Epidemic Sound
So thanks Epidemic for providing the music and sound effects. And now let's jump back into the video. From the film impact smart tools, the tool that I use the most out of all of them is called Motion Tween and I actually made a full video about Motion Tween.
Motion Tween

You can watch that right up here, but essentially it allows you to create quick zoom ins and some quick graphic animations as well. So I'll show you how to make a zoom in. First of all, you might have noticed in my videos. There are moments where I'm talking and I just want to do a little zoom in on my face without having to keyframe. Let's say right around here before I tilt my head. I want to zoom in and have a little closer zoom in on my face. So I'm going to press C to create a cut and then on this clip, I'm going to go to effect controls and all I'm going to do is scale in and use the position controls to get a little bit closer in on my face here. Now rather than keyframing here, all I have to do now is go to effects in drag and drop Motion Tween at this cut point. Now watch what happens. You will see well that doesn't look very great gal. I mean, there's a black square box what's happening. Well, actually what we need to do is select the transition go to effect controls and we need to change the render options from dissolved to composite. So it's going to composite the transition between these two clips.
So it just looks like a smooth zoom in transition. If you want it to be faster once again, just click the edge of it and just make it a little bit closer together and now it's a fast zoom in. So that's what I do throughout my videos by using Motion Tween. I'm able to create those zoom in and zoom out even in the beginning of my videos. You'll see that it starts close and zooms out through the power of Motion Tween. So you can do the same thing with screen recordings if you want to go to a closer area or to the right or to the left.
One other way you can use Motion Tween is with graphics like a logo. For example, here I have my gal logo and let's say I want it to drop in from the top and kind of twirl around to this ending point here create a cut just like before and on this first clip here. I'm going to select this and pull this off frame just by using those position controls from effect controls actually created a preset for Motion Tween with the composite already applied. So if I search Motion Tween, you'll see that I have Motion Tween composite preset.
I'm going to drag and drop this between the cut point here and now it just nicely animates down but there's more that we can do here from presets the drop down. I'm going to change it to bounce roll and now let's see how this looks. It's a little bit fast, but what I can do is press N to move this cut point over and that way I can have more room to press the end and expand the transition out. So it's a little bit slower. There we go.
So that's simple. We have an animation just by dragging and dropping it and changing the preset. So the smart tools are so useful. Of course, these are only just three of the 58 transitions and tools in the pack. The next category that I use the most distortions.
Distortion Transitions
You can see that there are a bunch of different impacts here that we can use from this new sequence here. Let's say you wanted to create a TV power on effect. There is a TV power impact that you can drag and drop on the beginning of this clip and now it looks like a TV is turning on well and older TV.
Glitch Transition
The other one that I use a ton is the glitch 2.0 impact. So if we can drag and drop that between these two cut points, you can see it creates a nice seamless glitch transition. And of course we can go in and go to the effect controls and make adjustments to this glitch. For example, if you want the color to be more of like a magenta you can play around with that. We can also adjust the scale how many artifacts we want to see if we want to make it more glitchy to produce a new effect and there's also surprise me just like all the transitions. You can just click surprise and see what it comes up with and sometimes it creates some pretty cool variations that you might like.
VHS Transitions
All right, VHS damage is also a very popular transition right now. You can drag and drop this just like before and it does a nice VHS transition. Also, you can use the VHS to create a really cool reverse sound effect. What I can do here is I can duplicate this clip. So press option or alt on a PC, drag it out and drop it. And on this one, I'm going to reverse it.
Rewind Effect
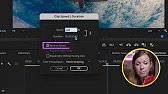
So I'm going to control click and go to speed and duration in here. Check reverse speed and I want to speed it up because if you're rewinding it's probably going to be faster, right? So we can do it by like 300% for now and it's going to make it a lot shorter. Go back to effects and drag and drop the VHS damage between the two clips. So now when we play this back.
It looks like we are rewinding the effect. So then we need to start from the beginning. Copy this original clip option or alt on a PC. Click and drag. And from the beginning, I can go back to the same frame as the end here when he jumps out. So right around here, then it looks like we're starting over again. The rewind happens.
And there we go. It starts over again. And better yet, we can add a sound effect here. Let's go into my sound effects bin so I can take this tape rewind sound effect, drag and drop it here and roll it in. So that way it meets the end of the transition. And now it will sound like a rewind effect, which is pretty cool. I applied a few more of the film impact distortion transitions and added sound effects from epidemic sound. And now let's play back to see how it looks in sounds.
Final Tips

And you can see how fast that played back like there was no rendering that needed to be done. These are optimized for Premiere Pro and built for Premiere Pro. Definitely encourage you to try out these transitions. This was just the tip of the iceberg when it comes to these transitions. You can really do so much and there's so many different creative transitions such as light blurs, light leaks and other types of transitions that I didn't even touch in this video. So I definitely recommend signing up for the 30 day trial. And if you like it and you want to get an annual plan, you can use my link below and get 10% off applied discount code and link is just down below. And don't forget to leave a funny comment below so you can get a chance to win one free year of the Big Bang subscription. Also don't forget to fill out the form below so I'll have a way to contact you if you are the chosen funny comment. If you want to learn more about transitions in Premiere Pro, you can click right over here and you can go check out my templates and presets on my store by clicking right over here.
Thanks so much for watching and as always, keep creating better video with Gal. See you next time.