Intro
In today's video, I'm going to show you how you can add gradient fills to your titles in motion graphics in Premiere Pro. Let's get started.
So here in my timeline I have this text animation and this is actually a part of my essential titles pack which is available in my store so you can click up here to go check that out. But what if you wanted the text fill to be a gradient? How would you do that? So you can see here I have the graphic layer selected and from the essential graphics panel, you can see I have three different text layers.
Updating Text Color Fill

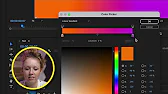
So the middle one if I wanted this to be a gradient fill I can just click on fill and from solid I can use linear gradient or radial gradient. So if I choose linear gradient, I can then select this first color stop and choose orange for example.
Customizing Location & angle of gradient

And then the second stop let's choose like a purplish pink color and you can adjust the angle if you don't want it to be directly top to bottom. We can adjust this angle and you can see how it rotates around and here you can also choose to adjust how much of the purple you want in the gradient versus how much of the orange you want. So you can play around with these sliders to create more interesting gradients.
Adding an additional color to a gradient

And if you click here, you can also add another color. So if you wanted to add three different colors, that's how you would do that. But if you don't want to add another color, you can just delete that.
Adding gradient stroke fill

But what about the strokes? If we select this text, which is just a stroke, it's not a fill. You can also add a linear gradient or a radial gradient to the stroke fill as well. So it's the same exact processes before just choose your colors and you're done.
Adding shadow gradient fill

You can also add shadows to your text and the shadows can have a gradient now. So you can see here that there's linear and radial gradient available for shadows as well.
How to Add multiple strokes and shadows

And you'll notice next to stroke that there's a little plus icon and next to shadow. There's a plus icon as well. So this will allow you to add multiple shadows or multiple strokes. So for example, if I wanted to add another stroke to this, I could add a second stroke and you can increase the width and you can make this stroke a different color. So I didn't really know what these plus icons did before, but now you know that you can add multiple strokes and multiple shadows. And I'm Kelsey. Welcome back. If this video is helping you out so far, be sure to give it a thumbs up as well as subscribe. I want to give a special shout out to Envato Elements for sponsoring today's video.
Envato Elements
Envato Elements is my go-to source for all templates. So if you're looking for title packs, transitions, animated icons, they have it all and they also have stock video as well, which is very useful if I need to find something funny or if I'm looking for a particular shot that I'm not able to capture myself. And when I was a freelancer before I started my YouTube channel, I would use Envato templates to create really cool promos because I didn't have time to do all the motion design myself. So that's the big benefit of Envato Elements. You can use my link below to get seven days free so you can download as much as you want unlimited without any licensing restrictions.
And after that seven day trial, you can get 70% off your first month using my link below. Alright, so now let's jump back into the gradient fills. So as you see here, we added a gradient fill to the text fill and to the stroke as well. But what if we want the background to be in the gradient? So I'm actually going to undo this and make the text white again so we can make the background a gradient. So what we can do is with this graphic layer selected, we can go to the rectangle tool.
Adding background gradient fill
We can just click and draw a rectangle that can be in the background.
And you'll notice that it created a shape 01 on top. We want to move this down in layers, so I'm going to bring this down below. Let's go to appearance and select fill and let's change it from a solid fill to the linear gradient. And you can see I've already selected the orange and the pink purple color. You can also choose the radial gradient if you prefer that. But one thing I want to show you after you hit OK, you can go over here to the selection tool and you'll notice that there is this line here that you can control.
adjusting the gradient style

So you can move this and make it a diagonal and you can drag it out to control how much space and blending you want between both of the colors. So if I drag this up here, I can also take this point and drag it down so you can play around with this line to get more even and spread out gradients. So now we have our nice animation with the gradient background. If you want the gradient to fade out, you can select the graphic layer, go to the effect controls and from the shape layer here, we can actually animate out the opacity so you can toggle animate to select a keyframe, move forward and then bring it down to zero.
Animating the gradient background

So that way the background gradually fades out with the animation as well. So that's how you work with gradients.
Product of the week: audiio
And now this week's product of the week is audio. So you probably heard me talk about a lot of different types of music licensing platforms and audio. What sets it apart is that it also offers a lifetime music license. So if you buy this, you would never have to buy it again and you can use it on any type of platform. But if you want sound effects too, you can get their audio pro plan and get 70% off your first year. And there's a code in my description box below to get that 70% off. And one thing that I love about audio is that it literally says a license that covers any video platform in the universe.
So that means you can use the music and sound effects on any type of end product that you can imagine. Also on the audio page when you browse for music, there's a little money symbol next to the song and that means that it's been approved for YouTube monetization. So you don't have to worry about getting any copyright strikes, which is really useful information. So definitely go check out audio. It's great. So that's all for today's video. I hope you found this gradient tip useful and you can start using gradients in your own videos.
And if you want to learn some more stuff about essential graphics in Premiere Pro, you can click right over here and you can sign up for my workshops right over here. Thanks so much for watching and as always keep creating better video with Gal. See you next time. Bye.