Intro
In today's video, you're going to learn how to create fast and easy captions in Premiere Pro. Let's get started.
So adding burned in captions on social video is pretty much a given. Now you need to have captions on your videos and Premiere Pro's new captioning workflow makes it really easy and transcription is free so it will auto transcribe your sequence for you.
The workspace
You may have to make a few edits. So let me show you how it works. So here my timeline I have this vertical sequence and I want to caption it for Instagram reels. First make sure you're in the captions and graphics workspace. Then go to the text panel here on the left and make sure that you're in the captions tab.
Transcription

Now I'm going to show you three options. The first thing we need to do is click on transcribe sequence and here's an ask you what language is the transcription and so I'm going to select English and then you can choose what type of audio analysis in this case. I don't want to just transcribe audio track one. I want to do the full mix and then press transcribe and what this is going to do. You need to have an internet connection, right? It's actually uploading the audio data and it's transcribing your sequence. So here's our transcription and as you see when I click on different words, my playhead moves because each word is time coded to the timeline. Now at this stage, we could go in double click edit and fix any misspellings or any grammatical errors that happen, but you can always do that later on once you create the captions too.
Create Captions
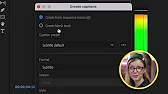
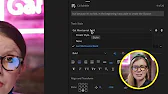
So in this case, I'm going to click on this button called CC and it's create captions and from here you can choose to create from the sequence transcript, which is what we want to do. We don't want to create from a blank track and then you can choose the caption preset. You can see there are a few different options. If you're just doing social video, it's probably just going to be subtitle default. You can always import a different preset though if you need to and then style you can use one of your existing styles, but in this case, I will show you how to create your own style later on and then you can choose the maximum length and characters the minimum duration and seconds. You can always adjust this later on from the essential graphics panel and then the other parameter that I use a lot is lines single or double. So if you want to have double stacked on top of each other or just a single line of text in this case, I'll choose double and then here you can see the captions are here on its own dedicated captioning track. So if I select one of these clips here, they behave just like video clips and when I click on them, it shows the corresponding caption number over here inside of the text panel. So you can zoom into the timeline, change the duration and move around the captioning tracks here. If you need to adjust the timing here, if you need to update the text, if there's a typo or something, there's a couple ways you can edit the text. First you can go over here to the text panel and double click and update the text here in the panel itself or you can go directly into the program monitor and double click on the text and edit it here just by typing in new text.
How to Edit Captions
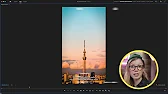
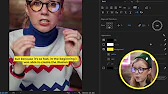
You can see here it's quite small and difficult to see and we will stylize this in just a second. But if you need to make this bigger, you can click on the program monitor and press the tilde key so you can see here it says first I downloaded the audio clip and extracted the training audio and you can see it's kind of hard to read. So this is where we probably want to add a background fill and make a thicker font and actually move the captioning up because on Instagram you know you have some of the text beneath it. You don't want the captions to be covered by the user interface of Instagram. But first if this video is helping you out so far, be sure to give it a thumbs up as well as subscribe.
Why Envato Elements is awesome?

I also want to thank Envato Elements for supporting this channel by sponsoring today's episode. If you haven't used Envato Elements yet, it has been a game changer for me as a creator. They have anything I need from stock video to animated titles to transitions to graphics templates to a funny background track if I need to place some music behind my video and some sound effects as well. Let's take a look at some of their video templates. So here in the video templates category as you scroll down, you can filter by specific categories. For example, if we just want titles and then what I really love is they have filter by application support. So if you just want to find titles for Premiere Pro or just for DaVinci Resolve, you can click on one of these categories and that way it narrows the search down. Of course, you can add keywords to further refine it like just lower thirds, for example, or just kinetic titles, but you can also sort by popular and new so you can filter by the latest and the greatest titles here inside of Envato Elements. And the best part is you can download as much as you need to use in any number of videos for any type of videos. And I've never once had any licensing issues when using music or any of their assets when I upload it to YouTube. No copyright strikes at all. So you can use my link below to get 70% off your first month and you can download and try it out and see if elements can help benefit your workflow as it has mine. All right, thanks Envato. And now let's jump back into stylizing our captions. One other thing that I recommend doing is clicking on the vertical workspace because this will move the program monitor over so you can look and see the text better visually.
Fill Per Line
And you'll notice that it moved my text panel over on the right. If you want to move it back over to the left, you can click on the name and drag it over to undock it and redock it into a new location. Before we stylize the graphic, there's one little hack I want to show you that will help with the design. So it looks more like the Instagram style. If you go to the essential graphics panel and click on the three lines, little hamburger menu here next to it, you can go to what is called text layer preferences. Now not a lot of people know about this. By default, the fill mode for the background is all lines and that means it's going to create a giant rectangle behind all of the text. But if you change it to per line, which is what I have currently, it just fills it to the end of the text. So that way it's going to look more Instagram friendly. So I'm going to press OK. And it's important to change this before you actually stylize the captions because otherwise you're going to get the all line fill. So what we're going to do here is click on this caption, the first caption here, and it will bring up the essential graphics panel from which we can stylize it.
Changing Font & Size
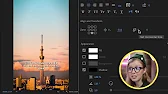
So the first thing I'm going to do is change the font to my default font, which is Mont Serrat bold. And you can see it looks a little bit big. So I'm going to change this down to like 42. And then I'm going to bring this up using the align and transform tool. So this is the vertical parameter. I'm going to bring this up so that way it doesn't cover the Instagram UI. Another thing that's bothering me is that audio. That word is just on its own line. I want to bring it up. So one way that you can do that is by controlling these controls over here. This is set the horizontal size. So if I click on this, this will actually make the length of the line longer. So it brought up the audio to the second line here.
Adjusting appearance
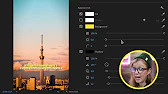
Another thing that I want to do is add a background which is related to the per line fill that I was just talking about. So here I'm going to click on background and it defaults to kind of this gray transparent background, which I don't really like. I actually have saved in my libraries my own color theme.
And if you control click or right click, I can go to get info and it makes these colors nice and big. So I can actually use this dropper tool to select this yellow and then I can increase the transparency so it's completely opaque and I can increase the width around the text. And if I wanted to have rounded corners, which is what I like next, I'm going to change the fill to black and remove the shadow. So now it's just easier to read, right? So now you might be like, well, do I have to do this for every single caption in my timeline? Well, you used to have to do it manually a few versions of Premiere ago, but now you don't have to.
How to save a style
Now what I can do is go up to track style and I can say I want to create a new style and I can call this gal Montserrat bold and press OK. So what this did is automatically apply that style to every single caption in the timeline. Now there may be a few where you have to go in and kind of change the orientation so you can double click press delete just like in a text document and move a couple words around so that way it fits. You might have to go over here and extend the character with a little bit more for certain lines because there may be more text on certain captions than others, but you can just go through and make all these updates to create your captions. So you might ask where is the track style being saved because every time you open up Premiere Pro that track style disappears, it actually saves into your project panel.
How to Export a Caption style
So here you can see that there's this Premiere icon. This is gal Montserrat bold. That's the caption style and it will import into your project panel. You can always control click on this and export the text styles which you can save in a template project folder or share with somebody else if they want to use the same caption style as you. But the one thing that I don't like is that these are not automatically saved in the drop down for you, which doesn't make sense. It's like if I'm going to have a captioning style, it should live inside of the essential graphics captioning tools, right?
Future of captions
So that's an update that I would like to see. You might also ask the question, can we add transitions to the captions because they are like their own video clips now on the captioning track. But as of right now, when I'm making this video, you cannot add transitions or animations to the captions, which I know a ton of you want myself included, but the Premiere Pro team is aware of this and I have spoken to them saying that this is a must have. We want to be able to animate our captions to make them dynamic for social video. So hopefully in the future it will be coming soon. So hopefully this video helped you out. If you want to see some more text and title videos, you can click right over here. And if you want to check out some cool presets and templates on my store, you can click right over here. Thanks so much for watching and as always, keep creating better video with a gal. See you next time.