Intro
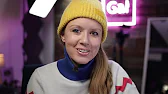
In today's video, I'm going to show you how to record high quality remote interviews for your video podcast and how to design really cool split screen layouts in Premiere Pro. Special thanks to our friends over at Riverside for sponsoring today's video. You can use code Premiere Gal to get 20% off any plan. Alright, let's go ahead and jump on in.
good example of split layouts
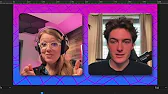
With video podcasts and interviews, I think it's super important to have fun and be creative with your layout. For example, I really like what Seth Worley and Ryan Pauley did with the " Riders Room" game show layout. You can see that they've split up their two heads into two different talking headshots. And in the background, they have these different colors with this rotating grid and the name of their show in the corner, which is just very eye-catching. Every time I see this, I'm like, Oh, it's the 'Riders Room' game show, so it's great branding. Let's take a look at a couple others. So on Instagram, they even did it in a vertical format with subtitles. They did this nice crop and the grid in the background. Here's another example on Instagram where they're looking at a script and then they have a circular mask around their heads. It's very aesthetically pleasing.
How to Record with Riverside
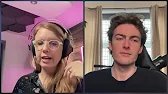
Earlier this year, I was a guest on the podcast on Splice, and Shiny, who's the host of the show, he was able to record our entire interview inside of Riverside in 4K. And the best part is he showed me that he could download the separate video and audio tracks for each person or export it directly to Premiere Pro. And I was like, " Oh, I gotta try this out". I was able to use Riverside to interview Finzar, a fellow YouTuber and editor, about his process of designing a thumbnail for my channel. And sharing my studio link was really easy. I just copied it and I sent Finzar the link to my studio. And what's really cool is when a guest will join with your link, it'll ask them if they're wearing headphones or not. And if they're not wearing headphones, then it will apply an echo cancellation, which is super useful. It also makes it easy to select your camera input and your mic input inside of Riverside. I use a Rode NT-USB mini microphone, or I use this Comica Lavalier mic that can also work directly with your computer. So if you're interested in these mics, I'll just drop a link just down below. I was able to record our call in high resolution and share the media with him so we could look at the thumbnail at the same time and it nicely adapted the videos to the size of the screen. A couple other cool things. If you go up to media, you can actually play a sound effect. So if you're live streaming and you wanna have a Bravo clapping sound effect, you can click on this and press play.
And you can also add media here as well to your media library that you can use in reference throughout your stream. And let's say you don't have access to a video editing program.
How to Edit Your Videos with Riverside
You can actually edit your podcast or your interview directly inside of Riverside. So for example, if I click on the FinSAR recording here, you can go to edit. You can choose what type of aspect ratio. Let's say we want to do a vertical story. You can use this timeline to create your edits. You can also adjust the layout. So for example, you can choose what tracks you want to show. So if I don't want to show the media that we were sharing with the screen, we can just show the two talking heads here from the size. We can again adjust. Let's say we want to go back to square. You can click on that and it will automatically resize it, which is super useful. And I haven't seen this yet in a software like Riverside. And then from layout, you can choose how you want it to be divided.
So I can have it be the full screen without the edges with the gaps full frame AI. So that will automatically adapt the layout according to the speaker shared AI. So it'll also have a tiny little video of Finn in the corner. I'm going to go with the grid with the gaps. And then what's really cool is you can choose a background, bright rainbow background like this. You can also click on plus to upload your own background.
And from here, I can go up to export and I can choose the video quality, for example, if I want it in 4K and then I could normalize the audio levels, remove any background noise and hit export and upload it to Instagram.
Snippet of Finzar Interview
You kind of make this filter to the faces. What exactly do you do and kind of why do you add that kind of like hyper real? I'm aware that faces are such a big part of making them stand out a lot of the time. And when you think about the psychology behind it, how people just they'll just keep scrolling and it's so brutal. I feel like there's almost no point in not exaggerating the face more because that is something that is known to grab people. If you're interested in trying out Riverside, remember, you can use my code Premiere Gal to get 20% off any plan. But let's say you want to actually edit in Premiere Pro to access the auto transcription and all the cool captioning tools and lots of other effects.
How to Send Recording to Premiere Pro
We can go back to the dashboard in Riverside.
Instead of clicking on edit, I'm going to click on export and you can combine all the tracks into one timeline automatically by exporting it to Adobe Premiere Pro. Or if you use Descript, you can send it to Descript and Final Cut Pro is coming soon. So let's click on Adobe Premiere Pro and then click on download timeline. And now you will see that there are all of the clips here, including the high quality wave file, which is the audio clips.
In addition to the video and there's an export dot XML file. So if you're like, what the heck is that and how do I use it? Well, actually, you can just import that XML directly in Premiere so you can open up a new project, drag the XML into your new project panel. It automatically created a sequence for us that we can double click on, which has all of the footage from our recording already synced and ready to start editing. So now you can see as we play it back, everything is in sync here.
We have Finn's video here.
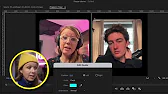
How to Edit a Split Video in Premiere
And if I turn that off, my video is on video layer one and on video layer four here we have the thumbnail that was recorded as part of the screen share and we can just disable that. For now, we don't need to have it on screen, so you can actually right click and click on enable to disable that. So this isn't a multi camera sequence. It just has our two angles stacked on top of each other. So now let's show you how to stylize the podcast.
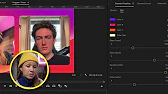
So first, I'm going to press C and shift and V to go back to the selection tool to select this and press shift delete to get rid of that excess in the beginning. So the first thing I want to do is create a mask around Finn and then myself and then add a background with Finn's clip selected. Let's go up to effect controls. From here, I'm going to click on create four point polygon mask. And then from here, I'm just going to hover over the corner, press shift to scale it up a bit to around right here. And then I'm going to click and lasso and select the bottom two points and then drag and press shift to keep it proportional as I drag this down to around here and the same at the top. So I think the sizing is right. But what if you want a rounded corner? This is where we can go over to mask expansion and increase the expansion to give it that rounded corner look. So then I can use the motion controls over here. If I select this, I can actually move fins are over to the right for now. And you can also scale him down if you want to make it smaller. So I'm going to copy this mask command C or control C. And then on my footage clip on video layer one, I'm going to go up to effect controls, click on opacity and press command V. And now you can see it copied the mask over. And here I can actually click on fins are and I can press copy and right click on mine and paste attributes of the motion. And it'll place me directly behind fins are. But then I can use the position controls to bring it over to the left. And then this is really cool to align them better.
How to Use Rulers and Guides
You can actually use the rulers in the guides. You can see that I have the rulers shown here. If you don't see it, you can go up to view and show rulers. So with the rulers on, you can click on the ruler here, click and drag to go to the center point. And you can actually right click on the line, select edit guide. And because this is a 1920 by 1080 full HD sequence, we can type in 1920, which is the amount of pixels, the slash, which is divide by two, and that'll place it directly in the middle. And it'll serve as that point from which I can then move them. So it's in the center. So so I can take myself here and I can move myself over using these controls in the same with Finn. And then you can do the same thing with the horizontal ruler. You can click and drag this to where you want it to be and then align everything up. Also, a quick tip, if you don't want to display the rulers as pixels, you can right click on the ruler and select percent instead. And that will help you decide, OK, I want it exactly at 50% instead of saying 1920 divided by two, for example. So once you're done, if you want to remove the guides, you can press command and semicolon and it will remove the guides. And you can do that to also turn them back on again. All right. So now what about a backdrop behind us? So we can actually select these clips and bring them up a layer. And let's say we want to apply a cool kind of gradient background.
How to Add Cool Backgrounds
I do have an extension here from Motion Can, and it's inside of the Motion Bro extension. I'll put a link down below. And they have a category called backgrounds. You can see that there's these moving shapes. I will select this one and hit apply. While it's great that you can edit the colors here and customize the motion graphics template, it's very slow at playback and it stutters and it just performs really poorly. So instead of using these backgrounds, I actually prefer to use a rendered out stock video clip that has kind of a looping design, which I actually downloaded a bunch from Envato Elements. So I'm going to delete the toko background here.
And then here I've imported under stock videos a bunch of cool kind of looping designs. And the one I like the most is this synth wave poly mesh thing. And let's drag just the video down into the timeline. Now you'll see it's very short. We can't extend it out because that's the length of the video clip. But we can make the design a little bit slower so we can press R and use the rate stretch tool to make it a bit slower around 70%.
Alright, that looks good, but now we have to duplicate this and it actually gets easier over time. So if we press option or alt if you're on a PC, you can duplicate the clip and we can do that again. As we create more, we can actually select all three of them and press option and drag it out to duplicate it. Select all of them, press option, drag it out to duplicate it. So now we have the nice background. So what if we want to add a drop shadows behind our talking heads?
We can go to effects and search for a drop shadow and drop this on Finn, for example. Nothing's happening. And the reason why it's not showing up is because there's a mask. It doesn't know where the edge is and it's not displaying that correctly. So first we have to nest it and then apply the drop shadow. So let's delete that and we can right click on Finn here and we can select nest, call it Finn's our nest.
Drop Shadow and Text
And we can do the same with me as well.
So now we can go to effects and apply a drop shadow. And from here, increase the opacity and increase the distance and then add some softness. And I think that looks really good. So then we can copy this effect command C or control C and go to the gal nest. Click up here in effect controls and command V. And now we have our nice drop shadow look. What about text on screen? We can select the type tool and let's type out our Instagram handles, for example, and reposition it. And then you can see it made this tiny little graphic here. And I'm going to actually expand this out so it takes up the full length of the timeline. Then we can duplicate it, press option or alt on a PC, drag up, and then we can select this new layer and we can reposition it using the align controls from essential graphics. Finn's our YouTube. So it didn't auto resize like it did inside of Riverside, but we're able to have some more control and add in some more effects. And I think it's looking really nice. So let's make it in a vertical format. First, let's nest the entire background because it's all of these tiny clips. So let's click and lasso and select all of them. Right click and let's nest it as background. Then we can go over here to the project panel. And from the fins are main sequence. We can actually duplicate this by right clicking on it.
And then we can call this vertical and we can right click on it and select sequence settings and then from editing mode. Let's go to custom and let's make sure to keep the same time base that it was. Then let's flop this. So it's ten eighty nineteen twenty press OK. And now if we open up the vertical from here, we can just take the background and from effect controls, scale it up and then we can just use the position controls to quickly move the talking heads into place as well as the text layers. And when you're editing vertical video, you can go over here to your workspaces and go to the vertical workspace. And here it'll just make it easier to see everything that's happening in the vertical because it makes the program monitor bigger. So from here, you're just going to use the razor tool to cut up your story and edit out all the bad takes, the arms and stuff like that until it gets to the point where you're ready to export.
But let's say you also want to add some nice music behind your talking heads.
How to Add and Level Background Music
This is where I actually recommend epidemic sound because they have some really nice background music for your videos that can be used on YouTube and social media, whether it's monetized or not. One of my favorite genres is alternative hip hop. But if you use my link below and you go to search and search for Premiere Gal, you can actually see my editing essentials playlist, which has some really nice background tracks to use in your videos.
From music, I can just drag my background music into the timeline like so. A few moments later, it's too loud right now when we play it back. So what we can do is actually select all of the background music and we can go to essential sound and select music and auto match. And this will basically shrink our audio clip. If I show you the before, it's really big. And after it just shrunk it down.
So now we can hear myself talking and Fins are talking with the background music.
Final notes
If it's still a little bit too loud, we can just select all of them and just reduce the clip volume slightly until it sounds about right. If you want to watch the full interview, you can go ahead and join my video editing community. The link is just down below. And if you haven't yet, go subscribe to Finsar. He has lots of cool video editing content as well. So that pretty much covers editing podcasts inside of Premiere Pro. If you have any other questions, just leave a comment below. And if this video helped you out, be sure to give it a thumbs up as well as subscribe. And if you want to learn how to add captions to your video podcast, I already made a video on how to do that. It's really easy to do. You can check it out by clicking right over here. And you can join my video editing community here and check out Riverside right up here. Thanks so much for watching, everyone. And as always, keep creating better video with Gal. See you next time. Bye. Bye.
- Ooh.