Intro

In today's video, I'm gonna share with you my top five Premiere Pro plugins, what they do and why I use them. All right, let's go ahead and jump on in.
So let's just set the record straight here. You don't need plugins to be a great editor. The key to plugins, at least for myself, is that they're time-saving. They help me get to the finish line faster so I can produce more content and feel more efficient. So the first most time-saving plugin that I use that's actually fairly new is the Storyblocks plugin.
Storyblocks Extension

To get the Storyblocks plugin for Premiere Pro, you can go to the Adobe Creative Cloud desktop app and search for Storyblocks. If you scroll down, there's the Storyblocks plugins. And this is where you can install it. You can see I already have it installed and actually there's an update. So I can go ahead and update it. But you need to make sure that Premiere Pro is closed before you update or install it. To open up the panel, you're gonna go to Window, Extensions, Storyblocks. So here inside of the panel, you can access unlimited video, footage, backgrounds, templates, audio, and images. And the reason why it's time-saving is you don't have to go to the Storyblocks web version to search and download. Everything can be searched directly here inside of the panel. So the Storyblocks panel is free to install from the Adobe Creative Cloud desktop app. But in order to download, you need to log in to your account. And you can choose from many different flexible subscriptions. And I put a link just down below so you can check out which one would fit your creative needs. So up here in the right corner, you'll see that I have a little avatar here and you can log into your account. And also from this dropdown, you can choose your download settings. So if you go to Download Settings, you can choose the folder on your computer that you want the downloads to be saved to so everything is organized. So from the dropdown here, I'm going to search for a template and I'm going to search for Lower Third. And now we have all these results here. So as we go down, we can click on one that catches our eye. Let's try the modern fast ones here. Let's click on this and then we can hit Download and click on the file size and it will begin to download. And now it's telling us because these are motion graphics templates, Mogert's to go to our essential graphics panel to the Browse tab. And you'll see that they are here already loaded up at the top. So I'm going to go over to a different sequence here with my talking head where I want to put a Lower Third. And let's go ahead and drag and drop this Lower Third on top of the clip. All right, so now this is the Lower Third and we can make customizations to it just using the parameters here that come built in with the motion graphics template. So I'm going to quickly go in and just change the style. And here's a time-saving tip. If you notice that the Mogert ends here, you can actually cut, so press C and cut here. So we don't need all this excess and just delete that part off. So that way it'll be quicker to render. So we can hit Return to render this out so we can see the full res preview. So now we have this animating Lower Third. I didn't have to do any animation and it saved me time because I didn't have to go to the web browser, search for the Mogert there and then install it in my essential graphics panel. It installed it for me.
So that's the main reason why I use the Storyblocks plugin and I don't have to leave the program. All right, up next is Beat Edit.
To demo beat edit, we need some music, right? So good thing that we have the story blocks panel 'cause I can go directly to the dropdown and go to music.
Beat Edit Extension
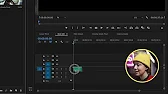
And here I can press enter to search. I can also go to filter and let's say we just want inspiring tracks that are electronic. We can also search by keyword if we remember a track name that we used before. So I'm gonna hit the download icon and I'm gonna download the WAV file because that's uncompressed, which is better for editing. Download complete and look at that, it downloads directly into my project panel and I can drag and drop this into my timeline. Again, saving us time, right? Let's make this bigger. Here is our WAV form. All right, now going to beat edit. So beat edit is an extension and it is a paid for tool, but you can try it out. I've put a link just down below. And essentially you have to have a sequence open with the audio track already in it. And from the audio player, select load music. And this is going to detect the beats. This is how it works. Down below, you can choose how many beats that you want. So let's say we don't want it every one beat, we want it every two beats. And press select, and then there'll be a marker every two beats.
So you can choose however much you want. If you wanted every four beats, you can type in four right here. All right. But how do you get the markers in your timeline so that way you can start to edit to these markers to make it easier and faster for you to edit? So you can go up to the toolbar and you can choose sequence markers or clip markers. I'm going to choose the sequence markers and select this little icon. Create markers. The markers are inside of the timeline. If you ever want to remove them, you can just go ahead and delete markers if you want to start over. So now we have a marker every two beats. And now I can automate clips to the beat markers. So the way this works is if I go back into my project panel here, I've actually already downloaded this footage from Storyblocks. Now, this part is really cool. We can select all the clips, press shift and scrub down to the last one. And we can click on this icon here, automate the sequence. And we want it to be placed at a numbered markers. And some of the clips have audio, which I don't want. So I'm going to ignore the audio, then press OK. We don't have enough clips for every single marker. That's OK, because we can go to Storyblocks or you can go out and get some more footage and import it and do automate to sequence again. But this is what it looks like.
So there's a new clip every two beats, and this is just a starting point, right? You don't have to have every clip at every beat because it can get kind of boring, but this is a great starting point from which you can then start to edit faster by using Beat Edit and automate sequence together. Now let's go on to the next plug in Cinema Grade.
Cinema Grade Plugin

So another plugin I recently started using for color correction and color grading is cinema grade. So the reason why I started using it is that it just saves me time through the point and click technology that it utilizes that Lumetri color does not have. And as I was editing this, I forgot to mention that I'm giving away three licenses of cinema grade. So if you leave a funny comment below and fill out the form in my description box, you'll get a chance to win.
So go ahead and do that right now, and then let's continue the video. So let me show you how it works and why I started using it so we can go to effects and search for cinema grade and double click to apply it to your clip, then go to effect controls. And you'll see that there's a button open controls. And once we click on this, it'll open up cinema grade app from which we can then make adjustments. So the thing that makes cinema grade more efficient compared to Lumetri color is the point and click technology. Let me explain what that is. So if we hover over this arrow on the right pops open these controls that we're used to seeing, but with cinema grade, let's actually click on the waveform to change it to the luminance waveform. Go over here to this little tiny icon next to exposure and actually click and move up to make your exposure adjustments. So again, just click, move your mouse up to make it brighter and move your mouse down to make it darker. So you can look at the waveform to make sure you're not peaking too much.
Another thing that's very useful is you can use this point and click technology with any of the controls here on the right. So, for example, contrast, we can click here, click. And add more contrast or less contrast by dragging down and then even better, the hue saturation curves. We can go down here. You know, you can, of course, adjust the hue saturation Luma down here. But even better, we can go up here to this icon to adjust the hue saturation Luma, and you can click and then move up on that color to change the color in the spectrum or go down to change it to be more blue. And we can always pop open the panel over here to see exactly what adjustment we made. So you can see it was minus 15. If you want to adjust the Luma of her face, we can go up here again to hue saturation Luma adjustment. Let's say we want to adjust this area of her face right here. We can click on it and then press command and click to just brighten this area of her face up. It will still affect some of the colors in the background, and I think it's OK in this case. And I think the pink color can be a little bit more saturated. So let's select the pink color and here let's press shift so I can pull it down to fade it out completely or boost it up. So let's go ahead and click on this to bypass all the effects. This is the before and this is the after. So just very subtle adjustments.
And the reason why I'm using Cinema Grade is it saves me time. And it's not a plug in where you have to pay subscription. It's actually a one time payment. And you can actually get 20% off with my code Premier Gal. And I put a link in the code just down below. You can also head over to the website to download 70 free LUTs, which includes Hollywood looks as well as some film green. All right. Now let's go to the next plug in. But first, I'm Kelsey. And do me a favor.
Creator Now Workshops
If this video is helping you out so far, be sure to give it a thumbs up as well as subscribe.
And also, I want to share with you that in 2023, I'm hosting workshops, a part of Creator Now. So if you sign up for a Creator Now membership before the end of the year, there's a huge sale and you can use my code Premier Gal to get an extra 10% off. And essentially, I'll be running live workshops. We're going to be talking about all sorts of different time saving editing techniques, storytelling techniques. And it's not just me. There's loads of other creators that are huge on YouTube that are leading the game in terms of editing and storytelling. So I'm really, really excited to be a part of Creator Now. And you can find a link just down below to go ahead and sign up for your membership. All right, let's go ahead and show you the next plug in film impact.
Film Impact Transitions
So film impact are my most used transitions and effects inside of Premiere Pro. If you go to effects after you search film impact, you'll see that all the transitions look like they're built in transitions inside of Premiere Pro. One of my favorites is called motion camera, which is part of the film impact smart tools back inside of this beat edit sequence that we created easier. What if I wanted to add a transition between the two clips? So motion camera creates these really cool seamless transitions. All I have to do is drag and drop this between the clips, just like any normal transition that we would have. And let's just play this back to see how it looks. Pretty nice, right? But we can go ahead and make this a little bit quicker. And all we have to do is just click on the end and drag it in to make it fast. That's it. Nice. And then from there, we can select it and we can go to effect controls from the presets if we want it to have a spin. We can try out the super twist and let's see how this looks.
For the icing on the cake, why don't we add a sound effect from story blocks so I can go up to story blocks here and let's go to sound effects this time and let's search for a whoosh sound effect. Let's just click on this icon to download it. Use wave and it downloads right here and then we can drag and drop it into the timeline and zoom in here just to line it up. And a quick tip I always say is press the option key or alt on a PC and use the greater than or less than symbols to nudge it over into place.
Nice. So if I want to create some quick cinematic looking transitions between different shots without overdoing it, this is where I turn to film impact. And of course, using different sound effects to help bring it to life. So you can click up here to watch the full review I did on film impact to see more of their transitions in action. And you can use my code Premiere Gal 10 to get 10% off a film impact subscription.
AeViewer Panel for organization

The next time saving plugin is AE viewer and it's actually C. The C. The next plugin is called AE viewer and it's actually free. You can see we get a ton of mogrts in here. And once you start downloading more and more it becomes hard to organize them. Of course, there's the search up here. But what if you forgot the name of that mogrt, right? So a better way to easily organize your mogrts are in folders, but you can't do that inside of this central graphics panel.
This is where AE viewer comes in handy so you can install the AE viewer, open up the extension, and here you can actually access your computer volumes here. And you can see that I've downloaded a bunch of story blocks mogrts, for example. And so if I wanted to use these rainbow echo titles, I can double click on them with the download. It actually came with an mp4 preview and a jpeg thumbnail as well. But you can see here it says mogrt.
So if I wanted to use this title, I can just move my playhead to the moment that I want to use it, double click to apply it. And here it is in my timeline. And from here I can select it and then go up here and make further style changes. So this is just an easier way to organize not only just my mogrts, but any media that I want to easily import into my timeline. So AE viewer, it's not really an effect. It just helps you stay more organized. So this exactly mimics what is on my computer. So if I add a folder or I add a mogrt pack to my story blocks mogrts folder, it will appear here.
Final Thoughts

Half of editing is organization, right? And making sure that we save the assets that we use so we don't have to go find it later on. So those are my top five plugins that I use inside of Premiere Pro. Of course, I use more and I've linked to my full list of plugins that I use just down below with a link so you can go check it out. I really hope that this was useful. These are really, really time-saving and I just want to reiterate again, you don't necessarily need to use these to become a better video editor, but they certainly save me time and I hope that they will save you time. If you want some more time-saving tricks, you can click right over here. And if you want to learn more about this keyboard that I'm cooking up, the Premiere Pro keyboard, you can click right over here to join the waitlist. Thanks so much for watching everyone. And as always, keep creating better video with Gal. Have a great day. Bye!