Intro

In today's video, I'm going to share with you my top keyboard shortcuts that I use that help me edit faster in Premiere Pro. And a special thanks to our friends over at Tideo for sponsoring today's video. Using my link just down below, you can get 20% off your very own website chat bot. All right, let's go ahead and jump on in.
New ShortCuts Keyboard

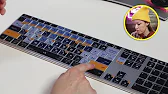
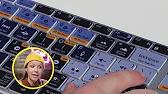
So Premiere Pro comes built in with hundreds of default keyboard shortcuts, and it takes time to get familiar with them. But once you know them, they start to become second nature. And what's really exciting is that I'm working on my very own Gal edition Premiere Pro keyboard, which I have my very first sample right in front of me here. And if you're interested in knowing when it's going to become available on the market, you can go to Premiere Gal dot com slash keys. So my keyboard here comes with all of the default keyboard shortcuts for Premiere Pro and the color scheme. We chose it specifically to relate to the Premiere Pro color palette and also my favorite color yellow as well. And you can see that the yellow keys in the shift directly correspond to secondary shortcuts.
Secondary Keyboard Shortcuts
For example, if you're in Premiere Pro and you press the yellow shift key and then one of the numbers up here shift, for example, five, it'll open up effect controls because that's the shortcut to going straight to that panel.
And you can also press shift audio mixer and it will open up the audio mixer.
Keyboard Specs

So the yellow keys here will help you remember those secondary shortcuts. And also, this keyboard can be used wired, directly connected to your computer or wirelessly connected via Bluetooth, and you can connect it up to three different devices at the same time to connect it to your computer. You just need to first turn it on. And then if this is your first device, you'll just select the first Bluetooth key and then you'll go to your Bluetooth settings and connect it. And that's it. And if you ever need to charge it up, there's a USB-C port on the back that you can plug into your computer to charge it at the same time while you use it. And if you take a closer look at the design, you'll see that it's actually hybrid for both Windows and Apple. There's option and command for Mac and start and alt for PC. And here is where you can click to add the backlighting in three different levels. So we're very, very excited to release it. We can't wait. It's been over a year in the works. And trust me, you'll want to sign up for the waitlist because there's going to be a limited amount available in the beginning. And over a thousand of you have already joined the waitlist. So PremiereGal.com/keys. All right. Now let's show you some keyboard shortcuts. If you want to be able to quickly zoom in and out of your timeline, this is where I use the plus and minus keys to zoom in and out.
Zoom in and Out
And you'll see on my keyboard that it actually shows the zoom out timeline and zoom in timeline symbols so you can remember them.
So wherever your play head is in your timeline, you can press zoom in to quickly get to that moment and zoom out to get out of the timeline. But if you want to quickly zoom to the entire sequence, you can click on the backslash key and it will show you the full timeline. And if you click the backslash again, it'll bring you zoomed in to that moment that you were before. So here are a few more navigation shortcuts.
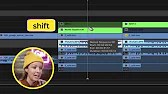
The first one is the J, K, L keys on my keyboard. J is rewind.
Rewind, Stop, and Fast Forward
K is stop and L is fast forward. So if we want to quickly go through the timeline, you can press L and then continue to press it to go faster and faster and stop. Press K and then J to rewind to go back in time and K when you want to stop. You can watch the video right up here to see how you can use the J, K, L keys in combination with the QW keys to do what is called top tail editing. Another really quick, useful one is just the up and down keys. If you press up, it'll take you to the previous cut point. And if you press down, it'll take you to the next edit point down the timeline. So let's say that you want to make a cut. The keyboard shortcut to make a cut is C. But if you click here on the play head where you want to make a cut, it will just cut that one clip.
Make Multiple Cuts at Once
And if you want to make a cut at all of those clips on that play head, press shift and then click and you'll get this double razor simple. And then we can press V to go back to the selection tool and we can select this.
Ripple Delete

And instead of pressing delete to get rid of that, we can press shift, delete and it will roll the clips together to create that ripple delete effect. OK, so I have a few more must know keyboard shortcuts. But before I show you, I want to tell you about Tidio.
So I use Squarespace to build my website and Tidio integrated with it perfectly. But it also integrates with hundreds of other apps like Shopify, WordPress and a ton more. For example, if somebody lands on my page, the chatbot will pop up and say, Hey, do you want to get a discount from everything bundle? But if you're like, you know, I don't really have the capacity to run customer service, that's OK, because you can set up a chatbot. Chatbot. But what you can do is customize your chatbot to come preloaded with answers. That way, people leave questions in your chatbot. They will be given answers right away to whatever questions that they have from the Tidio panel. You can actually go to the chatbot and here are a ton of different templates that you can start from, from increasing sales, generating leads or solving problems. The one that I have is to increase sales. If we go ahead and edit the nodes, you can see how it's set up.
It's triggered by somebody first coming on the site and then it will give an action. Hi there, would you like to get a discount? And then they can answer by clicking on one of these buttons. Yes, sure. Or no, thanks. If they click. Yes, sure. Then I'll ask them a question. Cool. What's your email address? And then we'll send them the discount. And then from there, it asks if they would like to stay up to date for the news. If they say yes, then they will be subscribed to the mailing list, for example. So this is just one example of one flow. And you can go ahead and browse all those different templates to see how it might work best for your needs on your website. So if you'd like to try out video on your website, you can use my link just down below to get 20% off a premium plan. All right, let's go ahead and get back into the keyboard shortcuts.
How to close multiple gaps

Another really useful one is closing gaps. So let's say you're working on an edit and after you're moving some clips around, there's some gaps in the timeline just like this. Well, what you can normally do is go up to sequence and select close gap. But I actually shut up shut up. But instead of going up to sequence and close gap, I set up a custom shortcut option G and look at that. All of the gaps close together. Set up a custom shortcut.
How to setup a custom keyboard shortcut
You can go to your keyboard shortcuts panel by pressing option command K. And this will bring up your keyboard shortcuts and you can search for a command like close gap. And here you can type in whatever key combination you want. Just make sure it's not used by another default key, because then you might forget that you change that. So I set my option G. If you're on a PC, I would suggest alt G.
The next keyboard shortcut is R for the rate stretch tool. If you click the end of the clip, you can extend the speed to make it slower. So right now I just change it to 71% and you can extend this even farther. 60% or you can make it faster.
Speed and Duration

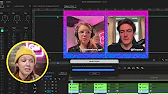
Now, I typically use this to make clips longer. For example, if I have a looping background clip like this one that I want to be a little bit slower. But one other shortcut that I use is command R. And from here I can further refine the speed or I can change the time interpolation. And for example, smoother time interpolation will be optical flow. So if we click on this, we're actually going to press enter to render this out to make sure that the slowing down the slowing down of the clip is more smooth. So now we have a slower clip that was slowed down using the rate stretch tool, and it just comes in a ton of handy. Next is another shortcut I use when I'm dealing with split screens. For example, I was working on this video podcast with Finza. If you haven't checked out the video that I made about this, you can click right up here to watch that. But in order to align these clips, I created guides from my program monitor.
Show and Hide Guides or Rulers
And if you want to quickly show your guides, you can press command semicolon. And there you can see the guides. And you'll also notice that I have the rulers visible with this. You can press command R to make those disappear or command R to make them appear. And remember, you need to have the program monitor selected in order to use these shortcuts. And I made these guides by just clicking on the ruler and dragging a new one down or clicking on the vertical ruler and dragging it over.
And you'll notice that I got it exactly at 50 percent here because I right clicked here and changed it from pixels to percent. And one way to get it to the spot quickly is to right click on the guide and select edit guide and then choose the position to get it exactly at 50 percent.
Nesting
And another keyboard shortcut I use to nest clips when I have multiple clips, just to simplify the sequence a bit more. For example, here I have these two nested clips.
It's the gal nest, which contains my premier gal text and my talking head. And I have Finzaar with his talking head and the text. But it could just be one nest, both of these together. So I can actually press shift and select both of these and then press shift and to nest these. And now it's just one layer. So you can actually simplify it, right? So you can go through and nest things using that shortcut rather than right clicking and going to nest.
It just saves you a few more clicks. And over the course of a whole edit that can save you minutes upon minutes of work. Another shortcut that's great for when you're towards the end of your edit.
Simplify Sequence
And there are a lot of different clips in your timeline like here that are disabled and it's not necessary to have them there. So what you can do is you can simplify your sequence. But rather than going up to sequence menu item down to simplify sequence, I set up a custom shortcut for option L and it will bring up the simplify sequence window.
And from here, you can close vertical gaps on video tracks. You can remove empty tracks, turn off disabled or muted tracks and disabled clips, and then press enter to simplify it. And you can see it is removed those disabled clips and muted tracks. And now it's just a lot more simplified. So there are really so many great shortcuts.
When to know how to setup custom shortcuts

And my keyboard here will help you learn a lot of the default shortcuts. But as you go through your workflow and you find you're using a certain right click a bunch and you're trying to get to that tool too often. That's when I recommend setting up a custom keyboard shortcut by going to your keyboard shortcuts panel and typing in a combination that works for you. If you want to learn some more keyboard shortcuts, I made another video a few years ago, and you can check out the keyboard shortcuts right over there. And you can click over here to sign up for my keyboard waitlist. Thanks so much for watching.
And as always, keep creating better video with Gal. See you next time. Bye.