Intro
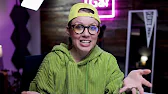
In today's video I'm going to show you how I made this Mary Poppins singing mirror effect for Instagram.
First off, I got this Mary Poppins outfit from Amazon.
Setup
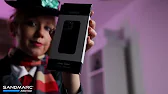
It was like around 50 bucks or something like that. Once I was in costume, we recorded four different shots in a vertical format. I filmed this entire scene using my iPhone 13 Pro Max in cinematic mode using my Sandmarc kit. So the Sandmarc kit is really cool. It comes with a really sturdy case, and on the case you can screw in different lenses. So I screwed in the telephoto lens on the back of the case, and then I mounted it on top of the Sandmarc tripod. And unlike other mobile tripods, this tripod is really heavy duty. You can also get other types of lenses that just help give it a more cinematic look. There's wide angle, there's anamorphic, and there's telephoto. And these little lenses come with little pouches as well so you can keep them safe when you travel. So if you're looking for a sturdy and strong setup when filming with your phone, I recommend Sandmarc. And a huge thanks to Sandmarc for sending me this kit to use and try out with my iPhone. And I put a link to the kit just down below. So here in Premiere Pro, I have all the shots laid out and synced. And if you wanna follow along, you can become a SuperPure subscriber and you can access these project files just down below. On video layer one is the empty frame here.
The Shots in the Timeline
And on video layer two, this is me singing direct to camera. Now you'll notice in the effect controls, I've already created a mask. So if we turn this off, you can see that there's me in frame still looking at myself in the mirror. So I wanted to remove myself on the left.
Making the Mask
So I just used the pen tool to click each corner of the mirror to create the mask. And on video layer three, this is the shot where I'm singing outside of the mirror. And for this shot, we're going to be doing some rotoscoping and I'll show you how to do that in just a second. And then up here is the part where I say cheeky, the reverse point of view shot.
- Cheeky.
- And then it ends here with two clips. On video layer one is just the clean plate. And then it ends with me just winking at the mirror. And this shot also has the mask. All right, so that's the setup. If you don't see audio waveforms, you can go up to the wrench tool and show audio waveform. So that way you can easily visually synchronize everything together with the original audio. This is the original audio. So I'm just going to disable this by selecting it, control clicking and selecting enable. Now those are darker and we will not hear the on-camera audio, just the original sound. Now it's time to talk about the rotoscoping situation. So as you can see here in this shot on video three that we need to rotoscope, my hand in front of the mirror. And when I bend down to take the scarf, it also covers the mirror. Looking back on this, what I wish I would have done is actually taped green paper in front of the mirror. So I could have just easily used the ultra key effect to select the green screen color and that's it.
Rotoscoping

I wouldn't have to do any rotoscoping, but we live and we learn. So in this case, what I had to do was actually rotoscope out the scarf. And this part was actually pretty hard. And what I ended up using was Runway ML, their green screen tool. I just exported this video and then I uploaded it to Runway ML.
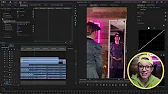
I was able to create a new project and I started from the magic green screen tool. And here I added my MP4 export into the timeline. And from here, you just click on an area to start the green screen roto. So after I click, you can see the AI tool had trouble distinguishing between what I wanted to select and what I didn't want because of the mirror reflection. It's actually a very complex roto. What I ended up doing was just selecting inside of the mirror. So I chose the exclude tool using the brush and I increased the size to deselect this area here. So you can see I'm just manually painting over this to remove that from frame. And then I use the include tool just to include the part inside of the mirror.
- One eternity later.
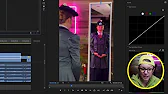
- This is the final result after I just selected the mirror. And you can see down here, all of these blue points, these were the manual key frames that I had to do. And a ton was done here for the scarf part, but it ended up turning out pretty great. So once it was done, I hit done masking and then here I actually selected invert. So the green screen would be inside of the mirror. So all that Runway ML did here was actually create a fake green screen behind myself using their green screen rotoscoping tool. So here I hit export and it went to my downloads folder. So this is the final video exported from Runway ML and I'm going to drag and drop this into the timeline and you can see it has the audio too. So all I'm going to do is sync it with the existing footage here. Now that it's synced up, we can disable the original clip on video layer three. And now we need to apply the ultra key effect to remove the green screen. So go to effects and search for ultra key and we can double click to apply. Then go to effect controls and down here, we can use the dropper tool to select the green and we can change the setting from default to aggressive. Now we see the roto worked. We can see myself singing and my hand is in front. So it actually looks like it worked pretty well and I didn't need to use a green screen behind me. You can see the scarf was rotoed as well. So it worked pretty well, even though it took a long time. So as you can see here, I turned off the visibility of this first clip. Let's actually turn this back on and then I'll create a cut here so I can just disable it underneath the green screen part. So I'm going to control click on this and press disable.
Animation & Nesting

Now we have this first shot and we cut to me. Now this is kind of drastic, right? So what we have to do is play a trick to the viewer here. For this first clip, I actually zoomed in. So I went to effect controls and I scaled this up. It was a bit tighter of a frame. So then when I turn, we have a cut and I'm in frame. And because of that zoom, it's a little bit less obvious. Of course, going frame by frame, it would have been nice if I would have been touching my face in the reflection going back, but it still works. For this next shot, I did a slight zoom in.
So I'm going to do is press C and cut here and actually nest all of these clips together. Control click or right click and select nest. So now it's just one layer. And here I can actually cut at this moment where the music kind of stops, press C. And on this nest, I can then do a slight zoom in. So here on position and scale, I will turn on toggle animation and go to about right here and scale up.
And then I can control click on this and ease in. So it's a little bit more smooth. Now it cuts to the wider shot and then it slowly zooms in over time. And then at this moment, it cuts back to the wide shot while I grabbed the scarf and then over top all the footage to make it look more cohesive and have a more film like look to be more retro like Mary Poppins. I added some film color grading from the project panel.
Film Emulation Grade
I'm going to go here and create a new adjustment layer. And I'm going to drag and drop it on top of all of the footage. And then from effects, I'm gonna search for film convert and double click to apply it. This is the film emulation tool that I use. And there's a link just down below if you're interested. So from film convert, I can change the film stock to a different color. For example, I can use the Kodak P400 and I'm also going to make it 16 millimeter. That way it looks a little bit more retro. And then you can control the size and the softness. So if I zoom in now to about 200%, you can see the film grain and it just looks a little bit more soft. If I turn this off, you can see the before and the after. So it just makes it look a little bit more retro. Now I added the sing-along caption.
Sing Along Captions
So if I go to the final sequence here, you can see on video layer eight, I created all of the text using the essential graphics. And then I just repeated this with a yellow background on all of the clips here. And then on top of the text, I animated a little bird graphic. If I zoom in here, you can see that I didn't do any key framing. I actually used a plugin called Motion Tween and you can see that it animates along with the singing. And yeah, that's all I did to create this Mary Poppins effect. If you want to learn some more cool effects like some witch takeoff and landing or a freeze clone trail effect, you can watch the videos right over here and you can click over here to watch and register for my live super peer workshops. That's all for today's video. Thanks for watching. And as always, keep creating better video with Gap.
See you next time. Bye.