Intro
In this video, I'm going to show you how to set up your stable diffusion so you can get the images in the exact pose and look that you want. Now, the tool you're going to use is called control net and it's really easy to install.
Installing ControlNet
So let's get into it. So the first thing you're going to want to do is open up stable diffusion the way you'd normally open up stable diffusion. And once you've got it open, head on over to get hub. And when you're in get hub, come up to the top left where the search is, and we're going to search for control net.
Click on the one that says Mike, you bill slash S D dash web UI dash control net. And open that up. Now come on over to this green button here, click on the little arrow to drop down and then click these little squares to copy the URL. Once you've copied the URL, we're going to jump back over to stable diffusion. We're going to click into the extensions tab, and then we're going to click on install from URL. You're going to paste the URL in right here, and then you're going to click install. All right.
Now that it's installed, we need to go and actually download the models. We can find the models by going to hugging face.co coming up to the top and typing in control net.
Downloading ControlNet Models
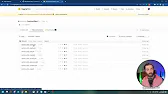
And then selecting this first option here that says L L L Y S V I E L slash control. And then we'll click on files and versions here, click on models. And here are the various control net models. Now, please keep in mind that these are 5.71 gigabytes each. So they are very, very large.
If you're only going to pick a few, the ones that I tend to use the most are the depth, the open pose and the scribble. I would definitely recommend getting at least those three. If you have the hard drive space, feel free to download them all and play with all of them. So go ahead and click on this download file arrow here to download each one of these. Remember they are large. So each one may take a few minutes. Once you have all the files downloaded, head on over to the folder where you installed stable diffusion. In my case, it's under AI and then stable diffusion web UI come to the folder called extensions. Open that up, come to this new folder that was just created called SD web UI dash control. Net open that up, double click into models. Go ahead and grab the model files that you just downloaded.
Testing the Models
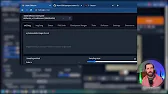
Put them in this models folder here. Go ahead and jump back over to stable diffusion, click on installed here, and then click on apply and restart UI. It will reload the user interface here.
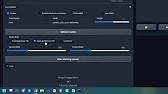
And then when you jump back into text to image, you should see this control net option. Now, if we open up control net and we click on enable, we've got a few models here that we can use. So let's first take a peek at the canny model and then let's drag and drop an image in. So I've got this image here of me in a thinking pose. I want to set the model on canny. And then on the pre-processor, I want to set this on canny as well. And now if I come up here and I give it a prompt, a handsome man with a beard thinking really hard and generate, you can see that it generated two images. Here. One is this outline. This is what the canny tool saw from my original image down here. It kind of found the outline and traced it. And then it drew an image based on the outline that it found. Now, if we come down here and we switch this to depth and then switch the pre-processor to depth as well, let's click generate. Now you can see there's two images down here and this one, it noticed the depth of the image, you can see that the parts of the image that are closer to the camera are lighter and the parts that are further away from the camera are darker and it can kind of detect the background here and it followed my prompt with the context of this depth map. And this is the image that it generated from it. It even determined my muscle size properly. So now let's switch this model to open pose. The pre-processor will change this to open pose as well. And let's go ahead and generate this one more time. And this time we got quite a different image because this is what it saw.
It saw the actual pose of where my neck, my head, my shoulders, and my arms are. And it generated a man with a beard following the same pose, but because it's not picking up the context of the depth of the image or trying to model the outline of the image, we've got quite a bit different of a beard and quite a bit different of a facial shape, et cetera, the fourth model that we downloaded down here is called scribble and it's not really designed for working with images like this.
But let's go ahead and see what happens if I put it on scribble and click generate. You can see that this is the scribble that it thought it saw, and it's not really a scribble, so it didn't really know how to handle it. And it generated this image. Now the pose is actually still kind of there, but it's just using this image for some slight context, but not doing a really good job of it. What this model is really designed for is if we come down here and we clear our original image and then click open drawing canvas, we have a little square here that we can draw in.
I can draw, let's see if I can draw like a cat here, a really, really bad cat. So here's the head. Here's the cat ears. Here's the cat tail. Here's the cat's legs. And let's put two eyes and let's use that as our scribble here. Now come up here and we'll change the prompt, a photo realistic image of a cat, and we'll generate that. And this is what it came up with based on my scribble drawing here.
It tried to match the composition of my scribble drawing, got confused on the tail, gave it a few extra legs here. Now, if you're using run diffusion and you have a cloud version of stable diffusion, you can see that control net is already pre-installed for you. They've already got it all set up. All of these models are already pre-installed. So you don't have to do anything extra. The people at run diffusion already hooked you up. Now there's another really, really cool extension. It's called the open pose editor. It's super easy to install.
Installing the Open Pose Editor
Let me show you real quick.
What you're going to do is you're going to head over to get hub over here and we're going to type in open hose editor. And you've got this one here from F K uni 1326. We can go ahead and click on that. Come up to the top, right? Click on this drop down next to code. Copy this URL here. Jump back to your stable diffusion, click on extensions, click on install from URL. Paste this in here and then click install. It'll take a second to install. And now it says it's installed. Click over on this installed button. Again, click apply and restart UI again. Now you'll notice you have another tab at the top called open pose editor down this open pose editor. You now have a little model here that you can move and form. However you want, you can actually select the whole thing, move them around like this, or select certain points and just move the various points. If you even want to, you can go and add a second model and put two characters in the scene. Let's have this one with their arm raised like this, and let's make this one.
Smaller and with their arms straight out like that, we can click on send to text to image here. And if we scroll down, you can see under the control net area, we've got our two characters here. Now I got to make sure I enable control net, make sure the priest processor is set to none here because this did the pre-processing for us. And then under model, we want to make sure open pose is selected. Now, if I scroll back up here under my prompt, I can say two astronauts standing on the moon.
Click generate and see what it comes up with. And there you go. You see our pose here. This was the original pose that we created, and this is the image that it generated an astronaut with one hand down and one hand in the air and a smaller, shorter astronaut with both arms to their side. Now, if you're using the run diffusion version of stable diffusion, this does not have the open pose editor installed by default, but if we come up here to extensions, click on install from URL, come back over here, grab this same code, jump into run diffusion, paste this URL in here and click install.
And then click on the installed button. Again, click apply and restart UI. You will see that you now have the open pose editor available to you on the run diffusion version as well.
Conclusion
Hello. So there you go. There's how you do all of the cool posing and getting the image to look exactly the way you want it to. I wanted to make this video because I get so many people asking, how do you make your YouTube thumbnail? It's probably the question I get asked the most since I've started this YouTube channel. There's some prerequisites to it. In order to be able to learn how to do the thumbnails, you need stable diffusion installed. You need control net installed.
You need to understand mid journey. So I made all the prerequisite videos so that now I can finally show you how I make my YouTube thumbnails. So stick around for a future video about how I make those YouTube thumbnails, because now you've got all the tools that I use to make these really cool thumbnails.
Outro
And if you love nerding out about all of this cool AI stuff, check out future tools.io. This is where I curate all of the coolest tools that I come across every single day. I'm adding new tools all of the time. If it's overwhelming to you, and there's way too many tools on the site, click this little button here to join the free newsletter every Friday. I'll send you the five coolest tools that I came across for the week and I'll keep it real simple. I'll also share a handful of news articles, a handful of YouTube videos, and one cool way to make money using AI. I send it every Friday. Join the list over@futuretools.io. Thanks so much for nerding out with me in this video today. I hope you liked it. If you did give it one of them thumbs up, it'll make sure you see more videos, just like it in your YouTube feed. And if you haven't already pressed the subscribe button down there, I really, really appreciate it. Thanks so much.
I'll see you guys in the next one.